
Build Consistent Products
Use documented dimensions and placement references so repeat orders look consistent across production runs.
Use this merchant DTF sizing guide to standardize transfer dimensions, improve placement consistency, plan apparel collections, and reduce sizing mistakes across repeat production orders.
A merchant DTF sizing guide is a production reference for apparel brands, print shops, decorators, and wholesale teams that need repeatable transfer dimensions across several garment sizes and placements.
Consumer sizing often focuses on a single shirt. Merchant sizing must also consider product ranges, garment suppliers, youth and adult variations, artwork proportions, press limitations, inventory planning, and repeat-order consistency.
The recommendations below are starting points. Always measure the actual garment because brand, cut, material, seams, pockets, zippers, and style can change the usable print area.
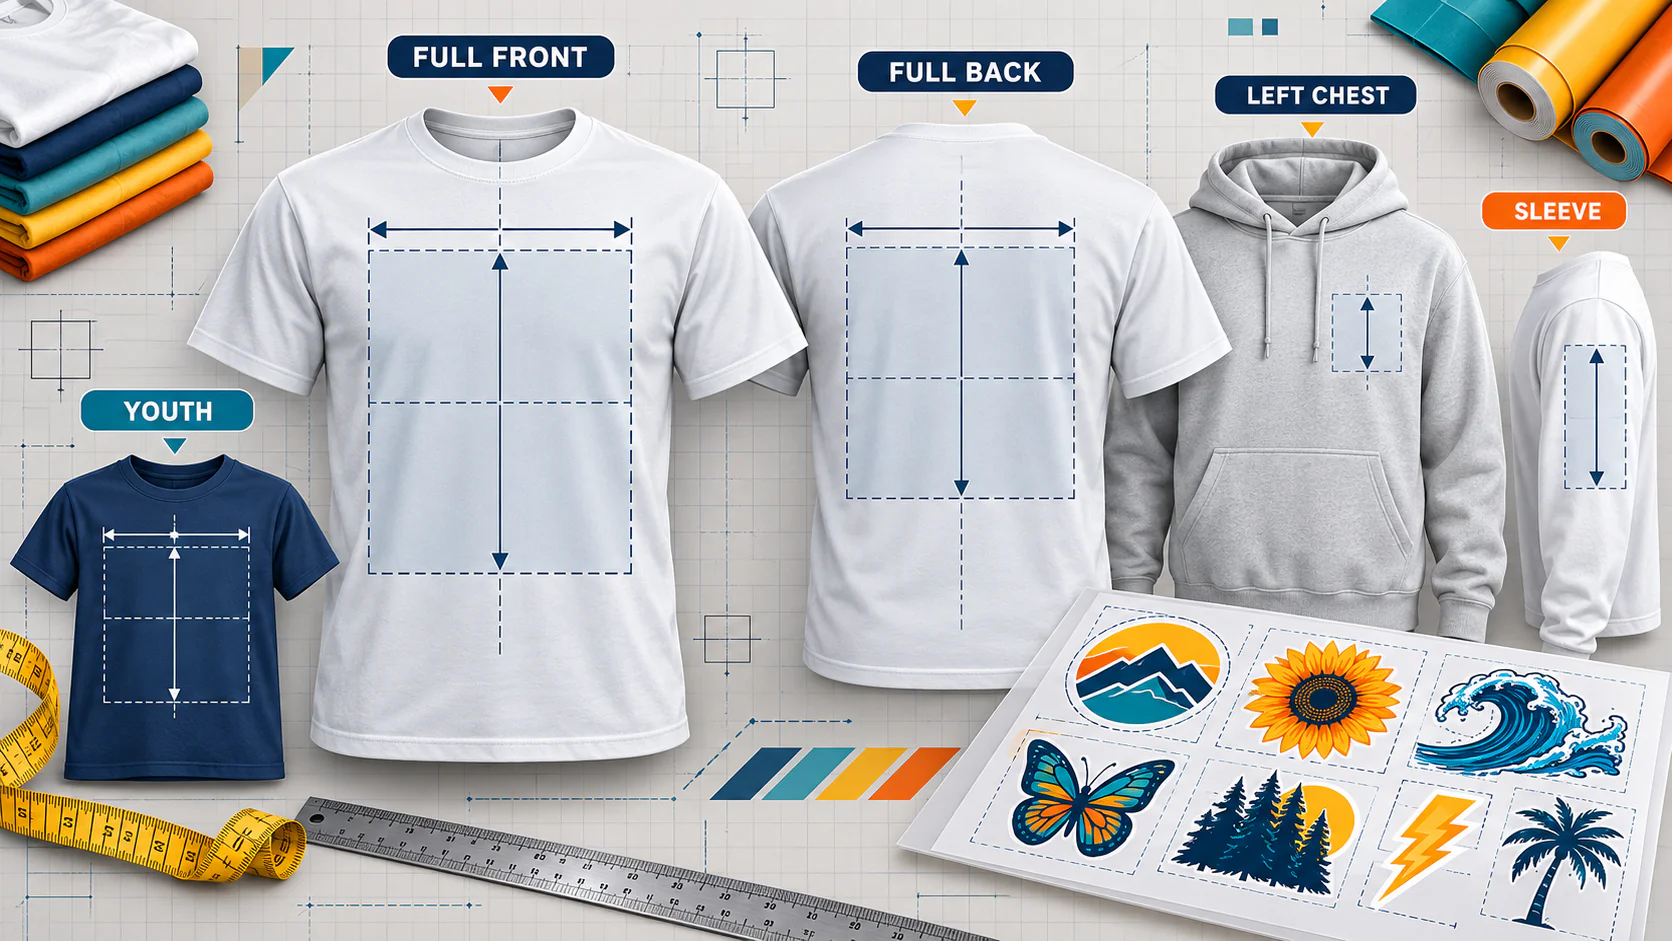
Use documented dimensions and placement references so repeat orders look consistent across production runs.
Measure garments and approve physical mockups before ordering large quantities of transfers.
Group artwork by size and quantity to use film efficiently while keeping designs easy to identify and trim.
These suggested dimensions provide practical starting points for common apparel placements. Adjust them according to the garment, artwork shape, customer preference, and desired visual style.
| Placement | Suggested size | Best for | Production notes |
|---|---|---|---|
| Adult full front | 10–11 inches wide | Retail shirts, branded apparel, and event designs | Check the smallest garment before using one width across several sizes. |
| Adult full back | 11–12.5 inches wide | Large graphics, team information, and promotional artwork | Account for shoulder shape, hood coverage, garment taper, and seams. |
| Left chest | 3.5–4 inches wide | Logos, company marks, initials, and compact branding | Check pockets, collars, arm openings, and the wearer’s perspective. |
| Sleeve | 2–3.5 inches wide | Small logos, flags, numbers, and vertical branding | Confirm flat space between the sleeve seam, cuff, and garment taper. |
| Long-sleeve vertical | About 2.5 inches wide by 11 inches high | Names, brand wording, and vertical graphics | Test the design and confirm that the press can apply even pressure. |
| Back neck or nape | 2–3 inches wide | Brand marks, size indicators, and small identifiers | Leave comfortable spacing below the collar and verify orientation. |
| Youth full front | 8–10 inches wide | Youth apparel collections and team garments | Scale according to the physical garment rather than its size label. |
| Toddler full front | 6–7 inches wide | Toddler shirts and small garments | Review neckline, arm openings, and artwork readability. |
| Infant full front | 4–5 inches wide | Infant garments and bodysuits | Check snaps, seams, print panels, and garment heat tolerance. |
Production rule: Approve a transfer size using the smallest garment that will receive it. If the design feels crowded, create a separate smaller transfer group instead of forcing one size across the entire range.
Each location has different space, alignment, and pressing requirements. Standardize both transfer dimensions and placement measurements.
Use the garment’s vertical center line and measure from a consistent collar reference point. Confirm visual balance with the shirt laid naturally.
Keep compact branding clear of the collar, underarm, and pocket. Judge the location from the wearer’s perspective.
Review shoulder width and any hood that could cover important information near the top of the design.
Measure the pressable area between seams and avoid placing artwork where sleeve taper prevents even pressure.
Use a compact mark with consistent spacing below the collar. Confirm whether the design belongs inside or outside the garment.
For shorts and joggers, check pockets, seams, garment taper, and the platen area before approving dimensions.
A single transfer can simplify inventory, but it may not look proportional across a broad apparel range. The merchant DTF sizing guide can be divided into small, standard, and extended garment groups.
Use a reduced design for infant, toddler, smaller youth, fitted, or narrow-cut garments when the standard design feels crowded.
Use the approved core size for the central portion of your product range after checking the smallest garment in that group.
Consider a larger version for oversized, extended-size, or wide-cut garments when the standard artwork appears undersized.
Separate sizes are most useful for large front or back designs. Compact left-chest logos may work across a wider garment range because their intended visual scale is already smaller.
Follow this workflow each time the merchant DTF sizing guide is applied to a new garment, design, or apparel collection.
This merchant DTF sizing guide creates a consistent starting point for apparel brands, print shops, wholesale decorators, and production teams. Apply the merchant DTF sizing guide whenever you introduce a new garment, placement, design variation, or size group.
Before approving a production run, compare the merchant DTF sizing guide with the physical garment. Record the approved transfer width, height, collar distance, artwork version, garment style, and size group. This makes the merchant DTF sizing guide more useful for repeat orders and multiple operators.
The merchant DTF sizing guide should support practical judgment rather than replace garment testing. Oversized apparel, fitted shirts, youth garments, hoodies, pockets, seams, and zippers can all change the usable print area.
One transfer may overwhelm small garments and appear undersized on oversized apparel.
Garments with the same labeled size can have different widths, cuts, seams, and usable print areas.
Transparent margins can make document dimensions different from the visible artwork dimensions.
Changing width and height independently can distort logos, lettering, faces, and geometric shapes.
Seams, pockets, zippers, and tapered panels can prevent the press from applying even pressure.
Without documented sizes and placements, repeat orders may vary between operators or dates.
Fine lettering may lose readability when artwork is reduced for youth, sleeve, or neck placements.
A full production order should not be the first time the design is evaluated on the garment.
A merchant DTF sizing guide works best when every file is clearly named, correctly sized, and ready for production.
Remove backgrounds that should not print and inspect edges for unwanted pixels, halos, or incomplete background removal.
Use high-resolution artwork at the final intended print dimensions to preserve details and readable text.
Include the design, placement, width, height, color version, or garment group in each filename.
Lock the aspect ratio before resizing so logos and other important elements remain correctly shaped.
Store editable artwork separately from exported files so approved sizes can be recreated accurately.
Inspect files at 100% and use a physical mockup to confirm detail, dimensions, and visual scale.
For file preparation help, review SpeedE Transfers’ DTF artwork and file-format guide.
For additional information about artwork resolution, review Adobe’s guide to image size and print resolution.
A merchant DTF sizing guide is a production reference used by apparel brands, print shops, and wholesale decorators to create repeatable transfer dimensions and placements.
Many standard adult full-front designs begin around 10 to 11 inches wide. The correct size depends on artwork shape, garment width, cut, size range, and desired style.
Not necessarily. One transfer may work across a limited range, but smaller, oversized, or extended-size apparel may need separate artwork sizes.
Many left-chest logos begin around 3.5 to 4 inches wide. Consider the collar, arm opening, pocket, logo shape, and wearer perspective.
Youth full-front transfers commonly begin around 8 to 10 inches wide, but the physical garment should determine the final size.
Use a documented reference point, measured collar distance, garment center line, and alignment tools. Record every approved measurement.
Measure the visible artwork. Excess transparent space can make document dimensions misleading.
Print the artwork on regular paper at the intended dimensions, trim it, and place it on representative garments.
Often, but not automatically. Measure the garment and evaluate the intended fashion style before enlarging the artwork.
Record the artwork version, width, height, placement, garment style, size group, alignment measurement, and approval date.
Yes. A gang sheet can contain several approved sizes and placements. Label files carefully so each version can be identified after trimming.
Use the DTF shirt sizing guide for general adult, youth, toddler, infant, and accessory recommendations.
Use this merchant DTF sizing guide to confirm dimensions, placements, and production groups. Then build a new gang sheet or upload your completed layout.